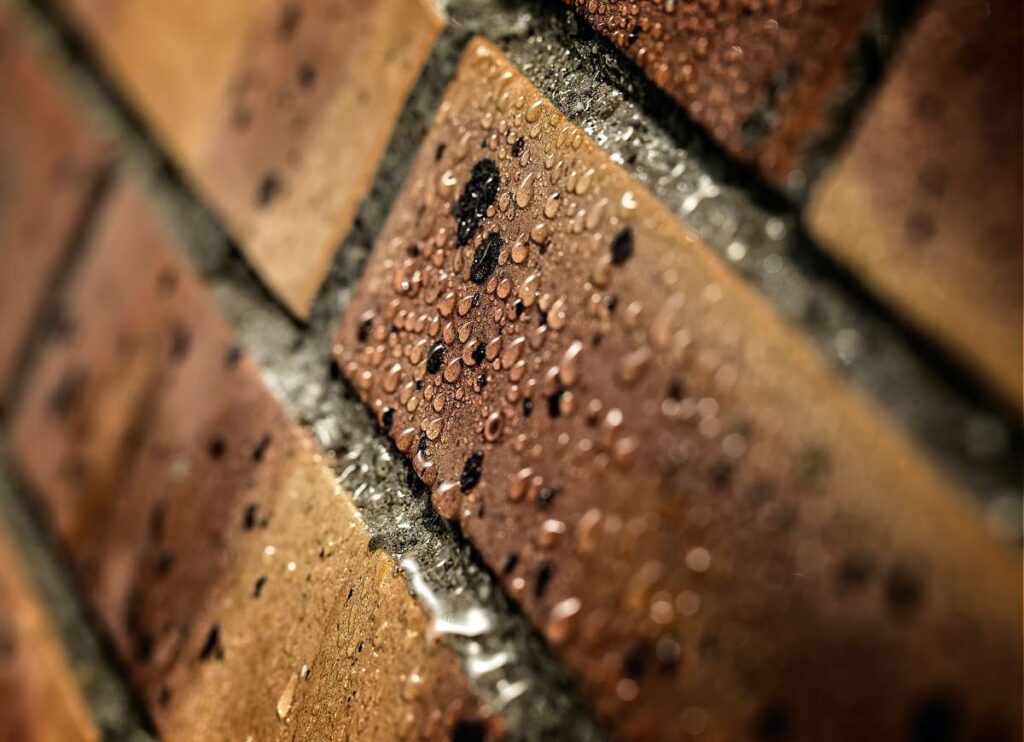
Water is a silent destroyer that can cause extensive damage to a home. If the exterior walls of your home are not watertight, then moisture can seep in and cause problems. Constantly moist walls are a breeding ground for mold and mildew, which can harm a home's structure and perhaps make its occupants sick. Water damage is a common problem, but it can be prevented if the exterior walls of the home are sealed properly. Waterproofing the exterior of a house is a task that may be done by the homeowner themselves thanks to readily available products.
Homeowners have complained about problems with their homes' waterproof coverings. One of these is that low-quality goods are more likely to become useless sooner rather than later, especially if they've been exposed to the constant downpours that are the norm.
This means they will have to reapply regularly—perhaps once a year. Waterproof masonry paint is often not waterproof in practice and often does not last as long as advertised. Furthermore, it is highly dependent on the thoroughness of the application and the planning that goes into it.
When it comes to home maintenance in the Melbourne area, Hitch Property Constructions has you covered.
The second issue is that waterproofing may disguise aging wall flaws that really need to be fixed, rather than just painted over. This is a better long-term option than just covering them up with paint. Homes built in the 1970s, a time when numerous novel building materials were introduced, are particularly vulnerable.
Waterproofing your home may be difficult, if not impossible, if you try to cover up the cracks in these materials by painting over them. The materials are starting to break down.
The third issue with waterproof coatings is that they don't allow the surface they're applied to to "breathe." This means that water will be unable to seep through the brick or stone and will be trapped inside.
Condensation, mold, and dampness are long-term difficulties because the water and moisture already inside the wall cannot evaporate or escape. It's clear that you want to avoid this issue at all costs.
Waterproofing is especially important for ponds' exteriors or retaining walls, which would be constantly subjected to wet conditions and high humidity. Walled ponds are ponds that have walls on all sides or walls serving as retaining walls. If your brickwork was not built properly, it will absorb the fluids and moisture, damaging the inside structure.
Identifying the Best Waterproofing Material
Choosing the right paint for the job of keeping water out is essential. The most effective brands are those that allow the exterior walls to "breathe," thereby preventing and dissipating an excessive buildup of moisture. Also, you will need to acquire a plaster additive. Using the right plaster is not only a great way to enhance the wall's aesthetic value, but it also has the potential to strengthen the wall's structural integrity. Concrete designed for masonry is the superior coating material since it can be applied to so many different types of surfaces.
For the longest-lasting sealing, look for silicate-based brands. Because it is formulated to attack the same elements as concrete masonry, it may be utilized to create a flawless coating that is adaptable and can be applied even to unpainted or unsealed walls. This results in an ideal coating that can be applied to any wall, regardless of whether or not it has been painted or sealed.
Waterproof additives inserted within the plaster can avoid water infiltration and the problems that come with it, even though the great majority of exterior plasters already have waterproofing capabilities.
Preparing the Walls for Waterproofing
A high-quality filler is essential for repairing and patching any gaps or cracks in the exterior walls of your home before you begin the process of waterproofing them. After the filler has dried, any excess can be removed with a grinder or sander. This will aid in keeping the surface flat and dust-free. Walls must be allowed to dry for an appropriate amount of time before the waterproofing can be applied.
Waterproofing is best applied with a high-quality roller or brush. On rare occasions, a second coat of paint will be required on the walls; if this is the case, you must wait until the first coat has dried fully. Your barrier must be strong enough to prevent water from penetrating it. The only way to guarantee its usefulness is to put it through rigorous testing.
The water tightness test is the standard method for evaluating the success of waterproofing in the industry. In order to achieve this, hold the nozzle at a thirty-degree angle and spray water along the wall's surface for two hours. A passing grade for the wall is achieved when a moisture metre indicates that it does not contain any moisture in any form. Hiring a professional is recommended for waterproofing projects because of the complexity of the work involved and the requirement for expertise, experience, and meticulous attention to detail.
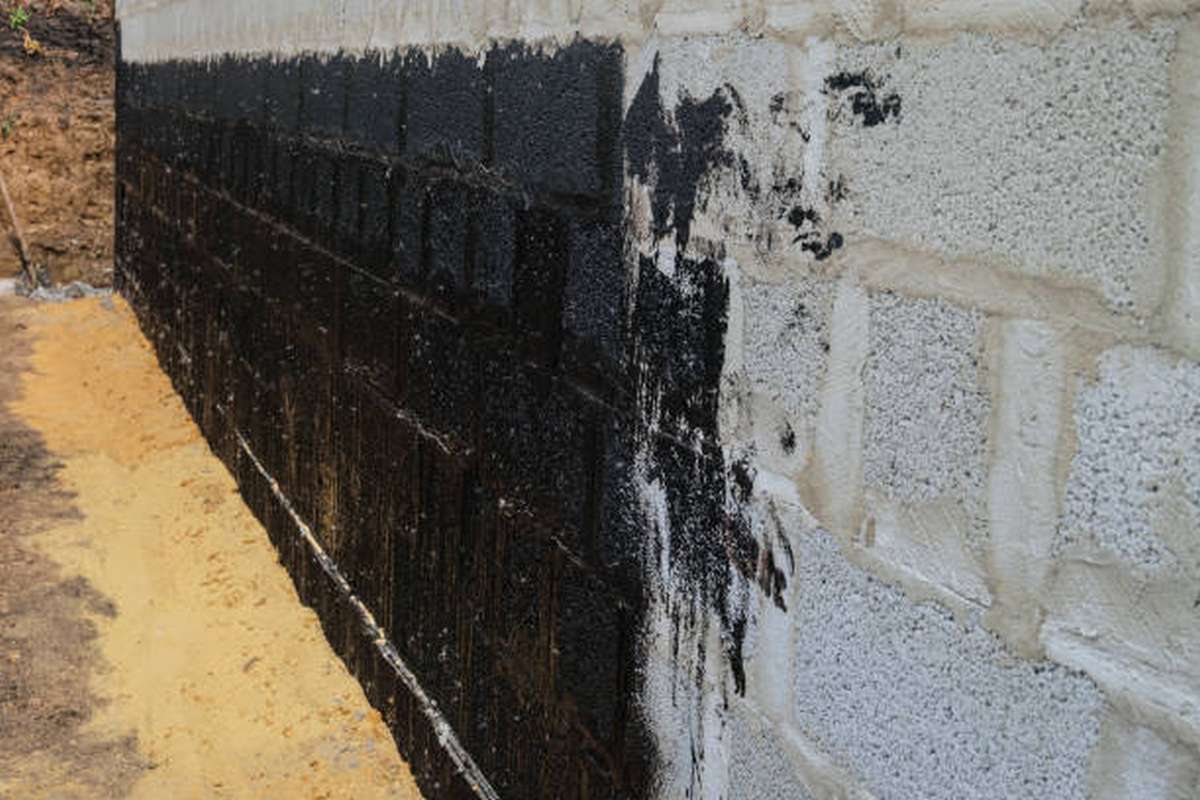
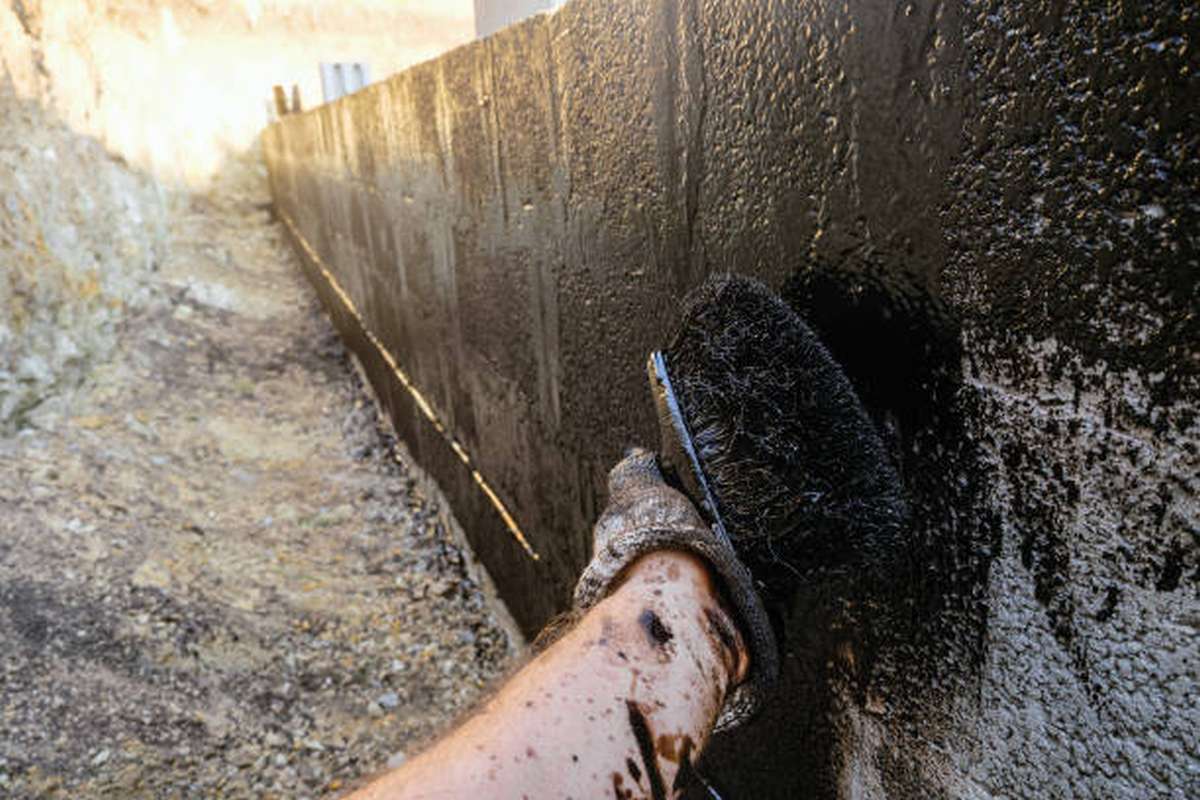
- The first thing you'll want to do is strip the finish off a sizable section of your home's exterior wall. There are two options for this: paint stripper or professional help. In order for the waterproofing compound to do its job, it needs to be able to penetrate the concrete in the wall.
- Wash the wall with the power washer and a mild detergent to get rid of any lingering chemical residue from the wall-stripping process.
- Repair any gaps in the concrete that are wider than the thickness of the waterproofing compound. The cracks in the wall may be filled using a trowel and some concrete filler; once you're done, just smooth the filler out so it's level with the rest of the wall. Make sure the filler is thoroughly dry before proceeding to the next step.
- Sandblast the wall or brush it with the wire hand tool until it feels rough. The product's texture needs to be rough so that it may "grip" the surface.
- Use the power washer or a hose to give the wall a good rinse to get rid of all the dirt and grime. Keep the wall moist as instructed by the manufacturer throughout the application procedure of the waterproof sealant.
- A brush or roller to apply the water-resistant sealant on the wall. Use enough of the product to ensure that the wall is completely covered, even if it has a rough texture. When putting a second coat of paint to a wall, you should wait for the first coat to dry if the instructions ask for two.
What’s More Effective, Water-Resistant Masonry Paint or Hydrophobic Coatings?
The importance of using the highest quality paint that can withstand the elements can be seen immediately. Yet, how do you choose between the available alternatives? Hydrophobic coatings and masonry paint are the most often used. You may go out and get both of those. Let's examine these in greater detail, starting with the first:
The Most Easily Accessible Option Is Masonry Paint
They offer a remedy that is both effective and long-lasting, and they do so for about two years before they need to be reapplied. Such durability is only possible with thorough wall preparation and skillful paint application.
In order to get the necessary level of waterproofing, you will likely need to apply a minimum of two applications. There is little outlay of cash at first, but given how often it must be repeated, it may not be worthwhile.
Garden walls, outbuildings, and sheds all benefit well from masonry paint, but this isn't always the best option for brickwork. Brickwork can be given a facelift with the help of masonry paint. Hitch Property Constructions is Melbourne's go-to company for all things related to residential facade renovation.
Water-Resistant Coatings
For maximum efficacy in keeping water away from the exterior of your home, you should use a coating that exhibits hydrophobic properties. So-called hydrophobic coatings come in a broad range of different forms and offer all the required features to avoid the issues mentioned in the previous paragraph.
A clear coating can be put on bricks using masonry creme. A brick's finish color will not be affected by this coating. These materials can penetrate the mortar up to 17 mm, which is deep enough to prevent water damage.
In addition, it is common knowledge that these products provide better thermal efficiency, and the producers of these goods assert that they will last for up to twenty years. The best part is that they are completely transparent once they have dried, so you won't be able to tell that they are even there if you look closely at the brick.
If you want to change the color of your home's outside walls, a facade coating is your best bet. Two coats of these very breathable paints are all that's needed to cover a wide range of wall irregularities, giving your home a sleek, contemporary look.
When dirt and water are repelled from the surface, it will feel cleaner and fresher. The manufacturer provides a 10-year warranty on these products, and they can survive for up to 20 years. They can be applied on porous surfaces like brick and stone and come in an array of earthy tones.
These hydrophobic compositions offer a fantastic chance to boost the visual appeal and thermal efficiency of your home. By adding insulation to the outer wall, you may prevent the walls from absorbing moisture and increase indoor comfort.
Is There Any Way to Know What Might Happen if I Don’t Waterproof My Outside Walls?
What should we do first?! Algae and lichen growth on brickwork and interior moisture seepage are virtually inevitable when the exterior of your building is left unprotected.
With our continually damp climate, it is crucial to waterproof the outer walls of your home. It will help keep your walls looking great for longer and protect them from damage. If you fail to take precautions, you will experience one of the following four problems:
Internal Damp Walls Are the Primary Issue Here.
Exposed brick walls that haven't been waterproofed let water soak in and spread across the surface and any cracks (such as gaps in the grouting).
This wetness and dampness may seep inside the house, doing havoc on the home's insulation and possibly even the walls themselves. These walls may never have a chance to dry out.
Surface Efflorescence
Efflorescence, or white patches, can appear on the brick's exterior if salts seep out of these damp regions and onto the brick's surface. They are next to impossible to get rid of and they make the place look terrible. You will never be able to remove that white patch from the wall if you don't allow it enough time to dry.
When they get inside, they can cause the plaster to "blow" on the internal walls.
Brickwork Damage
If water has gotten between your bricks, it could freeze and expand, causing cracks. Spalling is a problem because it allows moisture and organic matter to collect in the cracks, encouraging the growth of mold and moss and making professional brick repair necessary.
Decreased Marketability
Wet spots, white spots, mold, and moss all contribute to a less-than-desirable aesthetic all over your home. It's not enough to make sure the walls keep the building's framework safe. The way it looks, however, is just as crucial. Waterproofing is the solution.
How To Paint The Outside Of Your Home Such That It Is Waterproof Detailed Instructions
The exterior walls are the first thing visitors will see, therefore any damage should be repaired immediately. Your home's exterior walls will be constantly exposed to water and humidity now that the monsoon has started. It's possible for this dampness to slowly work its way through the walls and impact the interior walls as well.
In addition to increasing the likelihood of leaks and mold growth, constantly damp walls can damage any wooden furniture that is propped up against them. Waterproofing all of your outside walls is essential if you don't want your home to succumb to water damage from excessive rain.
Waterproof exterior house paint, as the name implies, is a specific kind of outside paint that prevents water from penetrating the wall. This barrier stops water and moisture from infiltrating or seeping through the walls. The term "waterproof exterior house paint" (or "rainproof exterior paint") refers to a type of external house paint that is impervious to water These paints, when applied to the exterior walls of a structure, dry to a filmy layer that protects the walls from rain and slows the appearance of cracks over time. Before you can complete painting the exterior of your home, you must first protect it from the elements and keep water out.
Is There a Guide to Choosing Exterior Waterproof Paint?
Most weatherproof exterior wall paints are designed with a flexible and elastic-like formulation to accommodate the wide range of environmental conditions that the walls of a building are subjected to. Meaning the paint will expand or shrink in response to temperature changes. This prevents the paint flaking off before it may spread.
This is a desirable trait, but the clean, shiny paint will quickly become covered in dust and fingerprints. Look for an exterior paint that can withstand the elements and protect your home from dust and dirt. The range of outdoor surfaces you'll be painting is another factor to think about.
Is it just the vertical walls that need painting, or do you also need to paint the roofs and ledges? There are exterior house paints that are great for vertical walls but should not be used on horizontal surfaces that are likely to become waterlogged or hold water for extended periods of time. Try to get a paint that can be used for many different things and meets all of your needs.
An Extensive Tutorial on Painting Your House's Exterior Using Waterproof Paint
Cleaning the surface of your walls to remove any old paint and any dust and grime that may have accumulated over time is an essential first step before painting the exterior of your home. You should brush away any slimy algae or moss growth that has established itself on the horizontal surfaces of your outside walls, as this is usually the consequence of water sitting in one spot for too long.
When the walls' exterior layer has been cleaned, any visible cracks should be checked for and patched with putty. This is a crucial part of waterproofing the exterior walls of your home because cracks are one of the most common ways water may seep inside.
Use an external wall primer to make your walls smoother and to create a surface that will be simpler to paint on before proceeding to paint the exterior of your property. Wall primers will help the exterior paint stay put.
The next step in effectively waterproofing a surface is to paint it with a watertight exterior paint. The exterior walls of your home need two coats of the dirtproof and watertight Indigo Exterior Laminate, which may be applied with a brush or a roller. Put one liter of the waterproof and dirt-resistant external laminate with 400 milliliters of water. This exterior house paint is best applied in three even coats for best results when covering horizontal surfaces. Each coat needs four to six hours to dry before you can apply the next.
The Benefits of Waterproof Exterior Home Paint
Using a high-quality waterproof paint on your outside walls has many advantages, the most obvious being that it protects your walls from moisture. Furthermore, your walls will be safeguarded from damage thanks to the application of waterproof paint. High-quality paint has a long lifespan if it is properly applied and maintained. Do you want to remodel your house? You needn't bother looking any further! Hitch Property Constructions is here to help you with any home improvement projects.
Walls that have mold or fungus on them can irritate the eyes, skin, and respiratory system. Congestion is another symptom that may result from mold. If you paint the outside of your house with a waterproof paint, you may prevent algae from growing there, which is good for your health.
Guidelines for Painting: What to Do and What Not to Do
- Make sure you know how to use all of the equipment properly before you begin painting. Brushes, rollers, trays, gloves, and a ladder should be within easy reach at all times.
- It is crucial to seal and cover all openings to the outside with plastic. Taping the edges of doors and windows before painting not only ensures a neat, precise line, but also keeps the paint off the actual door or window.
- Painting over an existing coat of paint requires working from the top down to avoid damaging the surface underneath.
- Always put safety first by taking all necessary precautions, and make sure to measure and follow all directions to the letter. If your ladder is wobbly or unstable, don't use it, and if your gloves are torn or otherwise damaged, don't use them either.
- Take your time and don't rush through painting the exterior of your home. It's common for people to speed through painting a building's exterior because they incorrectly estimate the amount of time it will take. To ensure that the paint job turns out looking as good as possible and that the walls are truly waterproofed, you need exercise patience.
Conclusion
Water damage can be prevented if the exterior walls of a home are sealed properly, and waterproofing is especially important for ponds' exteriors or retaining walls. Choosing the right paint for the job of keeping water out is essential, and selecting the right waterproofing material is essential. Waterproofing is best applied with a high-quality roller or brush and must be strong enough to prevent water from penetrating it. The water tightness test is the standard method for evaluating the success of waterproofing in the industry, and a passing grade is achieved when a moisture metre indicates that the wall does not contain any moisture in any form. Hydrophobic coatings and masonry paint are the most common options for waterproofing the exterior of a home, but masonry paint may not be the best option for brickwork.
Waterproofing the outer walls of your home is essential to prevent internal moisture seepage and protect them from damage, which can lead to four problems: internal damp walls, surface efflorescence, wet spots, white patches, and decreased marketability. Waterproof exterior house paint is a specific kind of outside paint that prevents water from penetrating the wall, preventing it from infiltrating or seeping through the walls. It is essential to protect it from the elements and keep water out. Waterproof exterior paint is an essential first step before painting the exterior of a home, and can be used for vertical and horizontal surfaces. It is best applied in three even coats and takes four to six hours to dry. Waterproof paint has many advantages, such as protecting walls from moisture and protecting them from damage, as well as preventing algae from growing.
Content Summary
- If the exterior walls of your home are not watertight, then moisture can seep in and cause problems.
- Water damage is a common problem, but it can be prevented if the exterior walls of the home are sealed properly.
- Homeowners have complained about problems with their homes' waterproof coverings.
- Condensation, mold, and dampness are long-term difficulties because the water and moisture already inside the wall cannot evaporate or escape.
- Waterproofing is especially important for ponds' exteriors or retaining walls, which would be constantly subjected to wet conditions and high humidity.
- Identifying the Best Waterproofing MaterialChoosing the right paint for the job of keeping water out is essential.
- Also, you will need to acquire a plaster additive.
- Preparing the Walls for WaterproofingA high-quality filler is essential for repairing and patching any gaps or cracks in the exterior walls of your home before you begin the process of waterproofing them.
- Walls must be allowed to dry for an appropriate amount of time before the waterproofing can be applied.
- Waterproofing is best applied with a high-quality roller or brush.
- On rare occasions, a second coat of paint will be required on the walls; if this is the case, you must wait until the first coat has dried fully.
- The water tightness test is the standard method for evaluating the success of waterproofing in the industry.
- The first thing you'll want to do is strip the finish off a sizable section of your home's exterior wall.
- Repair any gaps in the concrete that are wider than the thickness of the waterproofing compound.
- Keep the wall moist as instructed by the manufacturer throughout the application procedure of the waterproof sealant.
- A brush or roller to apply the water-resistant sealant on the wall.
- When putting a second coat of paint to a wall, you should wait for the first coat to dry if the instructions ask for two.
- The importance of using the highest quality paint that can withstand the elements can be seen immediately.
- Hydrophobic coatings and masonry paint are the most often used.
- Brickwork can be given a facelift with the help of masonry paint.
- Water-Resistant CoatingsFor maximum efficacy in keeping water away from the exterior of your home, you should use a coating that exhibits hydrophobic properties.
- If you want to change the color of your home's outside walls, a facade coating is your best bet.
- When dirt and water are repelled from the surface, it will feel cleaner and fresher.
- By adding insulation to the outer wall, you may prevent the walls from absorbing moisture and increase indoor comfort.
- Algae and lichen growth on brickwork and interior moisture seepage are virtually inevitable when the exterior of your building is left unprotected.
- With our continually damp climate, it is crucial to waterproof the outer walls of your home.
- It will help keep your walls looking great for longer and protect them from damage.
- Exposed brick walls that haven't been waterproofed let water soak in and spread across the surface and any cracks (such as gaps in the grouting).This wetness and dampness may seep inside the house, doing havoc on the home's insulation and possibly even the walls themselves.
- When they get inside, they can cause the plaster to "blow" on the internal walls.
- Your home's exterior walls will be constantly exposed to water and humidity now that the monsoon has started.
- Waterproofing all of your outside walls is essential if you don't want your home to succumb to water damage from excessive rain.
- Waterproof exterior house paint, as the name implies, is a specific kind of outside paint that prevents water from penetrating the wall.
- Before you can complete painting the exterior of your home, you must first protect it from the elements and keep water out.
- Look for an exterior paint that can withstand the elements and protect your home from dust and dirt.
- Is it just the vertical walls that need painting, or do you also need to paint the roofs and ledges?
- There are exterior house paints that are great for vertical walls but should not be used on horizontal surfaces that are likely to become waterlogged or hold water for extended periods of time.
- Try to get a paint that can be used for many different things and meets all of your needs.
- An Extensive Tutorial on Painting Your House's Exterior Using Waterproof PaintCleaning the surface of your walls to remove any old paint and any dust and grime that may have accumulated over time is an essential first step before painting the exterior of your home.
- Use an external wall primer to make your walls smoother and to create a surface that will be simpler to paint on before proceeding to paint the exterior of your property.
- Wall primers will help the exterior paint stay put.
- The next step in effectively waterproofing a surface is to paint it with a watertight exterior paint.
- The exterior walls of your home need two coats of the dirtproof and watertight Indigo Exterior Laminate, which may be applied with a brush or a roller.
- Put one liter of the waterproof and dirt-resistant external laminate with 400 milliliters of water.
- The Benefits of Waterproof Exterior Home Paint
- Using a high-quality waterproof paint on your outside walls has many advantages, the most obvious being that it protects your walls from moisture.
- Furthermore, your walls will be safeguarded from damage thanks to the application of waterproof paint.
- Do you want to remodel your house?
- If you paint the outside of your house with a waterproof paint, you may prevent algae from growing there, which is good for your health.
- Guidelines for Painting: What to Do and What Not to Do Make sure you know how to use all of the equipment properly before you begin painting.
- Take your time and don't rush through painting the exterior of your home.
Frequently Asked Questions About Waterproof External Wall
Check walls for faults: Waterproofing external walls is the best solution only if the walls become damp as a result of rainwater or moisture. Before shopping around for waterproofing products, it's important to eliminate any other causes of structural dampness.
- While the arrival of the monsoon season may bring relief to many, for house owners it is the time to prepare and protect their homes from water leakage.
- Check for any cracks in the walls and seal them.
- Exterior Paint.
- Caulking.
- Waterproofing During Construction.
After applying the first coat of paint, allow it to dry fully before applying the second. If necessary, you can apply a third or even a fourth coat of paint to waterproofing membranes to achieve full coverage. However, be sure to allow the previous coat of paint to dry before adding another.
- Don't paint during the rains.
- Use water-proof paints.
- Invest in Primer paints.
- Coating the walls with white cement.
- Check for cracks.
- Seek professional help.
- Some tips to keep in mind.
Solid stains require recoating after 4-5 years, on average. Sealers do not provide any coloration of the wood, but they protect it against moisture that causes rot and splitting. Most sealers last one cycle of seasons and should be renewed each year.