Dry rot in wood that has been infected must be fixed if the timber is to be saved from future decay. The fungus responsible for dry rot may thrive in low-humidity conditions, which is why it is so commonly associated with rotting in wood. Many various elements of a building are susceptible to dry rot, including the window sills, shutters, and roof runoffs.
It is also found in picnic tables, Adirondack chairs, and other types of wooden outdoor furniture. Wood that has been infected with dry rot must be repaired to prevent the fungus from spreading and becoming unusable.
When it comes to treating dry rot, do you have any idea? Dry rot, a type of wood degradation, can quickly spread throughout your home's framework if you do nothing about it. Although it may be difficult for homeowners to recognize, it is crucial that they do so in order to solve the problem before it gets out of hand. If left unchecked, dry rot can cause major flooding and structural damage. To prevent this from happening, please. Read on for tips on how to spot dry rot and make the necessary repairs yourself.
Where Does The Dry Rot Come From?
It is crucial to identify the root cause of dry rot before attempting a remedy. Although it goes by the label "dry rot," this decay can only occur in wet wood. Mushrooms gravitate toward it because the wet wood fibers they feed on help them proliferate. As time passes, the cottony substance they leave behind in the wood is covered by a thick, fungal mat.
Even if the fungus is eliminated, dry-rotted wood may be beyond repair. If the wood is too hollowed out and broken to be safe, practical, or aesthetically pleasing, you will be expected to replace it. Load-bearing posts and beams should be dismantled completely and correctly before being replaced, for reasons of public safety. Lumber can be replaced by removing just enough of another sort of wood, like door frames or trim.
When Does It Become Possible to Repair Dry Rot Wood?
If the wood has sustained just slight damage from the dry rot, it can be repaired. It may be easier in the long run, despite the fact that it needs more work than simply swapping out decorative or antique wood. Dry rot in wood cannot be fixed unless the affected area is both dry and exposed.
The next and most apparent stage in mending dry-rotted wood is the application of wood filler. To hide dings and scratches, the best option is to use a high-performance two-part wood filler, which is more potent and effective than regular wood fillers. A high-performance two-part wood filler is your best bet.
What Every Property Owner Should Know About Dry Rot?
Your current residence is likely one of your most valuable assets. If you want to keep your investment safe, it's important to catch problems early on, before they become costly complications. Dry rot is a common problem that might arise.
The root of this issue is a fungus that, through feeding on wood, causes dry rot. Due of this, the wood eventually breaks down, becomes brittle, and cracks. Dry rot is a serious problem, especially in older homes where the wood may not have been treated to avoid rot damage. Here's a rundown of important information concerning dry rot:
How Can You Know if You Have Dry Rot and What Signs to Look For?
The moniker "dry rot" may seem misleading given that fungi can only grow in damp conditions. Check the areas of your home closest to the sinks, bathtubs, and showers.
Corrosion can be seen from the outside in places where the gutters or downspouts have been broken. The rot inspection checklist should include the wooden window sills.
- Rain that runs off a roof and down the face of a wall.
- The joint between a deck and the house.
- The intersection of a horizontal and vertical plane.
You should inspect the wood for deterioration symptoms including cracks, splits, and discolouration. All of these symptoms might indicate decay. Inspect the roof, giving special attention to any areas that might have developed leaks. Dry rot can also set in at the points where the earth meets the wood of a building.
Dry rot can develop in damp indoor environments including basements and crawlspaces, unventilated attics, and any location a leaking pipe could potentially enter the house. It's also a good idea to look for water damage on the drywall. The rim joists of a porch, crawlspace, or basement are all places that need checking.
- The joint between a wooden structure and a masonry floor or wall.
- The tiled area of a bathroom that contains the drain and the wall of the tub or toilet.
Wood can be checked for rot using a pick or screwdriver. If timber peels off readily, it's possible that rot has spread throughout the wood. There could be rot hiding behind the flooring, drywall, or siding, but you wouldn't know it unless you looked for discoloration or noticed that the material didn't feel structurally sound when subjected to weight or pressure.
What Should You Do If Dry Rot Is Discovered in Your Home?
The rapid spread and contagious nature of dry rot necessitate prompt remediation efforts. First things first, you'll want to cut off the source of the moisture. If any of the wood has become structurally weakened, it must be replaced, ideally with pressure-treated wood. Finally, make sure the problem is appropriately identified and is differentiated from the damage produced by carpenter ants.
Find the source of the moisture and address the problem. If the damage is extensive, the old wood will have to be pryed off and replaced. If you need to temporarily remove some wood from a building, do so only after you've ensured its stability. Epoxy resin can be used to patch up minor rot damage in wooden structures. When the source of moisture has been removed and the wood is still structurally sound, a fungicide such as borate can be applied to the afflicted area to slow the spread of the fungus and prevent further damage to the wood.
Does Anybody Know How to Prevent Dry Rot from Spreading?
Rot is a form of decay that occurs in wood when it is subjected to wet conditions for an extended period of time. The likelihood of rot developing in your home can be minimized by taking the following precautions:
- Make sure your attic is well-insulated and has sufficient airflow.
- Crawl spaces need to have adequate ventilation at all times.
- Sealing the floors of the cellar and the crawl space can help reduce the quantity of moisture in the soil.
- Verify the correct routing of water by inspecting the flashing on the ceiling, walls, and roof.
- Make sure the deck and porch flashing is in good shape.
- Maintain a safe distance between the wood siding and trim, the roof, and the brickwork to prevent damage to any of these elements.
- Make sure the flashing around each and every window and door is done properly.
- Please keep up a consistent rate of painting and caulking.
- Be sure to regularly clean the gutters and downspouts.
Use a rain barrel to collect runoff or connect your downspout to a drain tile to divert water away from your home if there is a lot of it near your property.
Why Does Wood Dry Rot and What Causes It?
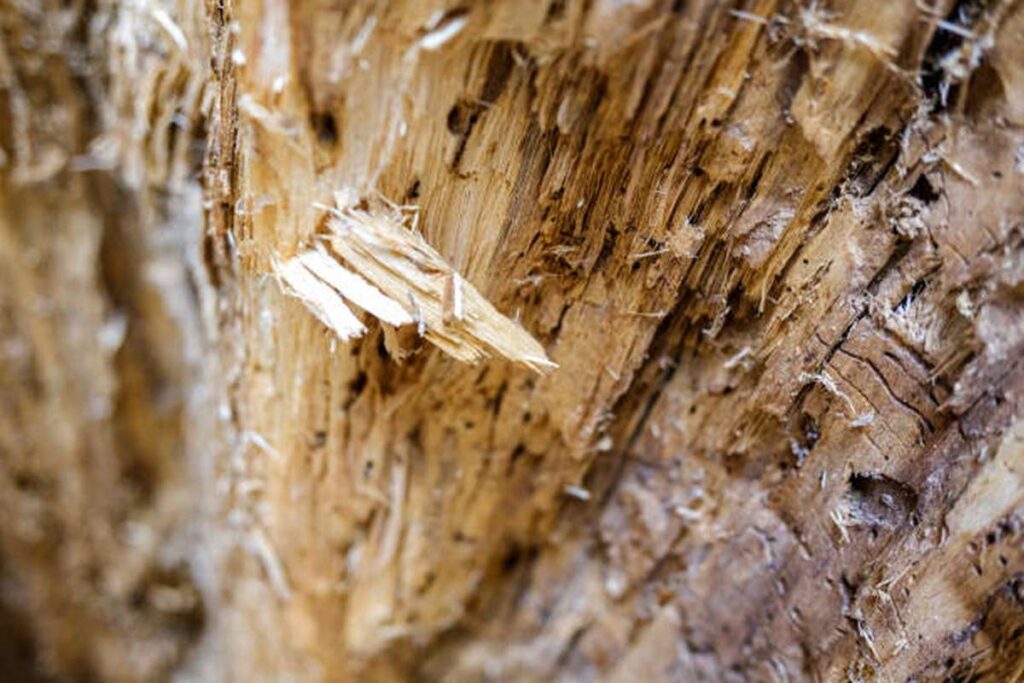
A specific kind of fungus causes dry rot. Despite the name, it is possible for it to grow if its spores drop on wood and there is enough moisture. As a result, the wood may develop a white or grey coating, or a body with a mushroom-like shape if the situation worsens. Another telltale sign of dry rot is paint that is peeling, flaking, or blistering.
- Darker-than-the-surrounding-area wood.
- Some green algae had grown on the wood.
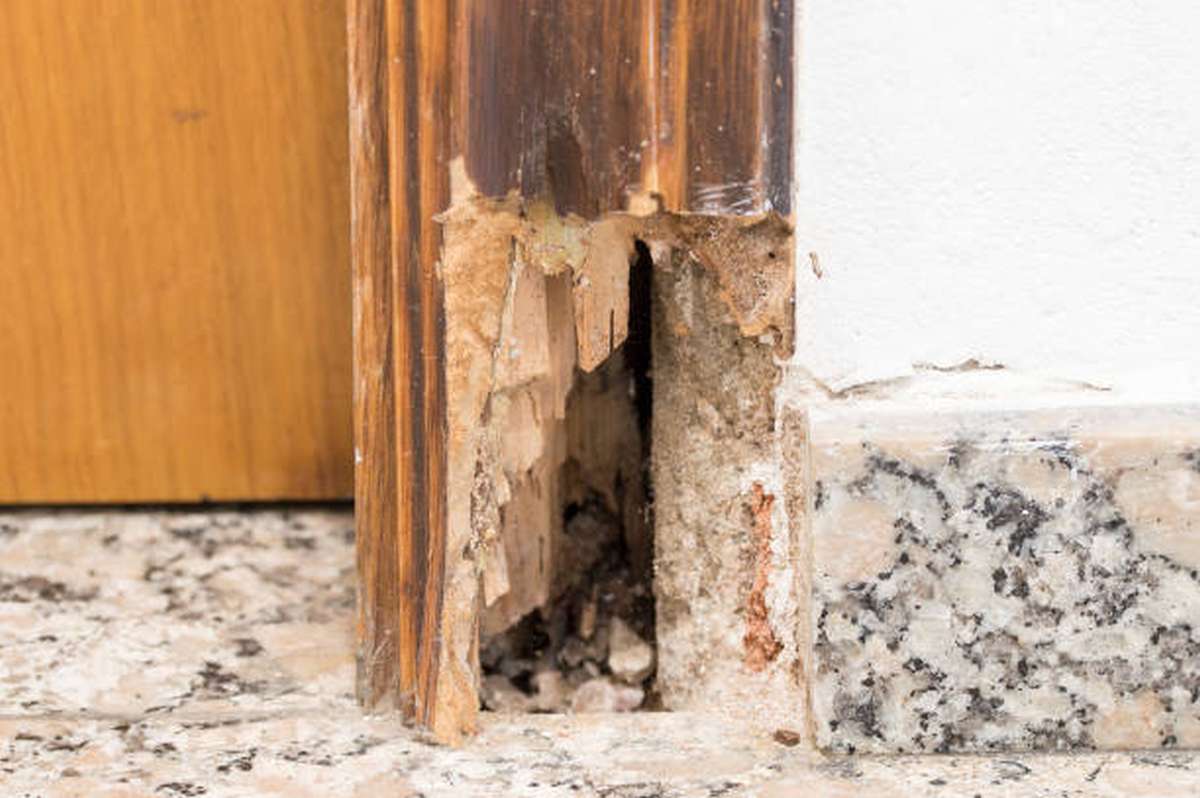
Window Dry rot is a prevalent issue that affects the sills and door sills of buildings, but it can also spread to non-wood surfaces that come into touch with the ground, such as plaster and cement. The most vulnerable areas are window and door sills.
Which Is Better, Replacing It Because It Has Dry Rot or Fixing It Because It Is Not Structurally Sound?
Fixing dry rot to a certain extent is conceivable, but not recommended if the affected components contribute to the structural stability of your homes. This is notably true for the joints and beams in the flooring, but it is also true for the flooring itself. Wood should be replaced rather than repaired in this case.
Whether you opt to repair the wood or replace it, you must eliminate the moisture and warmth that fostered the rot in the first place. Investigate the source of the dampness by checking the roof for leaks, the gutters and downspouts for damage, the plumbing for leaks, and the ventilation in the area.
The Methods Used To Replace Wood That Has Been Ruined By Dry Rot
In the same vein as with repairs, you should only attempt to replace rotten wood if you have a substantial amount of prior experience. The following activities will be a part of the work:
- removing all rotten wood as well as an additional three feet of wood from the surrounding area to make certain there is no remaining mould.
- removing all plaster, skirtings, panelling, linings, and ceilings in order to guarantee that no fungus will be left behind
- Cleaning any surfaces, including the steel and pipes, that are within five feet of the rotten wood or other material.
- The use of fungicide on any surfaces that are within five feet of the rotted area
- Changing to wood that has been treated under pressure
- Plastering over the affected area or coating it with a zinc oxychloride product in order to stop the spread of the dry rot.
During the course of this job, it will be necessary to clear your home of any and all rotten materials and dispose of them in an appropriate manner. As was the case with the repairs, the primary objective here is to remove all of the infected wood from your home and prevent the fungus from penetrating further into the building's framework.
When Considering Dry Rot vs. Wet Rot
Dry rot is often misunderstood by homeowners as being the same as wet rot, which is actually caused by a different fungus. Wood that has wet rot, which can be recognized by its damp appearance, needs to be replaced or repaired. If you find rot in your home, it's smart to get a professional's opinion as soon as possible.
What Are the Steps to Repairing Dry Rot on Your Own?
Prepare the Office for Work.
It's best to fix dry rot on a day when the weather is warm and dry. Since you'll probably have to conduct the fixes outside, you'll need warm, dry weather to ensure the stabilizer and filler dry properly.
Avoid making the repairs on days when the humidity is very high, even if the temperature is bearable. Rather, make sure you're working in a spotless, well-ventilated space with easy access to a place to dump any infected wood as soon as you spot it. As a fungus is responsible for dry rot, you must take precautions to prevent the spread of the fungus as you repair the damage. Most brands of wood stabilisers and wood fillers are poisonous, therefore it's important to wear protective gloves and other gear when working with them.
Discard any infected wood immediately.
One can use a saw or chisel to get rid of the dry rot. Repairing dry rot requires complete removal of the infected wood. The reason for this is that even a small number of spores from the fungus that has already affected the wood might spread to the healthy wood and cause further damage.
If you catch the issue in time, the damaged area will likely be small and straightforward to fix. If dry rot has set in, you can remove it from the wood by chipping at it with a chisel. If a saw is required, great care must be taken so as not to remove too much wood and render the item unusable. You should wait until the remaining wood is completely dry before continuing.
A Word Of Caution About The Good Wood
Apply a uniform layer of wood stabiliser to the good wood that has been exposed to the dry rot. Medium-sized brushes are versatile and effective for most painting tasks, but you're free to select a brush of a different size as needed. Stabilizer is quite close to glue in consistency, and as such, can completely damage the brush if it gets on it. Instead, use an old, clean brush that you know for sure has not been exposed to any mold or mildew, or pick up an inexpensive paintbrush at your local hardware shop. After applying the stabilizer, let it dry for several hours to make sure it's completely dry.
Put in Some Wood Filler.
Before moving forward, make sure the wood stabilizer has dried completely. Mix the wood filler and make sure it's thoroughly agitated. After the wood has been stabilized, a thin coating of filler should be applied evenly across the entire surface. You can apply a second coat once the first one has dried slightly. Repetition is essential. Applying a layer that is too thick the first time may cause it to not attach. Any extra filler should be sanded out before it dries, as doing so will be much more difficult once the filler has hardened.
Dry Rot Repair On Structural Versus Non-Structural Components
If you do uncover any dry rot, here's hoping that it's in an early stage when it may be readily remedied. However, if the dry rot is allowed to progress, it can spread to the structural framing of the building, which will necessitate replacing significant sections of the framing. Consider your home to be a person that is protected by clothing in order to differentiate between structural and non-structural forms of dry rot in your home.
You have the option to restore the damage caused by dry rot to the clothes, which includes the roof and the siding. However, if you uncover dry rot that has reached the bones (framing or beams), it is possible that it may need to be replaced. If you are unclear, you should have a contractor provide a free estimate for the repairs that need to be done and clarify which portions they would repair as opposed to replace. This important information can assist you in determining the level of damage that has occurred and estimate how much money you will save if you perform the necessary repairs on your own.
Gather all of the necessary tools and materials.
Tools for scraping, sanding, and drilling to remove dry rot; putty knives for applying epoxy; brushes for painting; and so on. You can watch videos of professionals fixing rotten wood online; when doing so, take notice of the tools and materials they use.
Dry rot can be fixed with the help of prepackaged kits that come with all the parts you'll need to get the job done, including instructions and tools. But, if you have a lot of broken spots that need fixing, you can save money by learning the process and buying the components separately. To name a few examples, you'll need a fungicide, wood hardener, epoxy, and paint to complete the task.
Remediation of Dry Rot Damage
To develop experience and confidence, it's preferable to tackle a large undertaking like repairing dry rot one step at a time, starting with the portion that has been damaged the least. Drying, setting, and hardening times vary according on the material, so it's important to pay close attention to the guidelines provided with the product before beginning.
When dry rot occurs, there are six measures that must be taken to fix it: If dry rot is detected, the affected area must be sprayed with fungicide, wood hardener must be applied, damaged wood must be replaced with epoxy, the area must be sanded smooth, and finally, an exterior acrylic primer and paint must be applied.
See to the Dry Rot.
First, scrape the top, then work your way down into the rot, and finally, scrape until all of the loose material is gone. The wood doesn't need to be perfectly smooth, but it should be in good condition.
Fungicide Spray
As the spores of the dry rot fungus are the cause of the damage, you should spray the fungicide in a wide ring around and within the hollow you just made. To get the best results, dry according to the instructions on the packaging.
Wear some Wood Hardener.
Use wood hardener generously to stop the spread of dry rot. Cover any visible wood in paint, and if the damaged area is sizable, consider drilling a few tiny holes into the hollow to help direct the liquid hardener where it needs to go. This will guarantee that the hardener is distributed evenly throughout the affected area. Follow the specified instructions for drying the material correctly.
All Damaged Wood Should Be Replaced With Epoxy.
Epoxy can be divided into two distinct categories. First, there's an epoxy that can be spread with a plastic putty knife and has the consistency of peanut butter, making it ideal for use on smaller areas. You'll find many parallels to the process of painting an interior wall after repairing holes. Epoxy putty with the consistency and feel of modeling clay is available for use on larger areas, and it may be moulded to create a variety of different effects.
After being molded, it can be used to make fine adjustments to trim components or to bridge large gaps. You must always adhere to the recommended drying and curing times. Once it's cured, you can sand it, drill holes in it, and screw it into place exactly like you would with regular wood. With enough practice, you'll be able to replicate any wooden object, including intricately carved mouldings.
Sand With No Roughness Whatsoever
A flat surface is essential for a professional paint job. Depending on how thoroughly you were able to smooth the epoxy, you may have very little or a large amount of sanding to complete. If you want to save some time, consider using an electric palm sander. Wearing a mask and goggles will help you breathe easier and protect your eyes.
Protect It With a Coat of Exterior Acrylic Primer and Paint.
We now consider you ready to start painting. Buying an exterior primer and paint together is a cost-effective and time-saving option. You should visit a store that specializes in color matching with a paint sample from your home. You might even choose a new color scheme and include this repair in the upcoming paint job.
Well Done on the Dry Rot Repairs!
When you've finished the first piece, snap a photo to compare it to how it looked before you started working. It's perfect in every way possible! You should be able to juggle multiple projects at once now that you have some experience under your belt. Make a list and check off the times as you travel. If you find yourself confused, remember to wait until the appropriate period has passed before proceeding.
Conclusion
Dry rot is a type of wood degradation that can spread quickly and can cause major flooding and structural damage. To prevent this, it is important to identify the root cause and make the necessary repairs. Dry rot is a common problem that can be repaired by using a high-performance two-part wood filler, which is more potent and effective than regular wood fillers. Signs to look for include corrosion, rain, and the intersection of a horizontal and vertical plane. Dry rot can spread quickly in damp indoor environments, so it is important to inspect the wood for deterioration symptoms, inspect the roof for leaks, and find the source of the moisture.
Dry rot is a form of decay that occurs in wood when it is subjected to wet conditions for an extended period of time, and can be minimized by taking precautions such as making sure the attic is well-insulated, crawl spaces have adequate ventilation, sealing the floors, inspecting flashing, and maintaining a safe distance between the wood siding and trim, roof, and brickwork. Dry rot can be repaired by removing all rotten wood, removing all plaster, skirtings, panelling, linings, and ceilings, cleaning any surfaces, using fungicide, changing to wood that has been treated under pressure, and plastering over the affected area. Dry rot repairs should be made in a spotless, well-ventilated space with easy access to a place to dump any infected wood. Wear protective gloves and gear when working with them, discard any infected wood immediately, and apply a uniform layer of wood stabiliser to the good wood. Dry Rot Repair on Structural Versus Non-Structural Components is important, as it can spread to the structural framing of the building and need to be replaced.
Dry rot can be fixed with prepackaged kits, but if you have a lot of broken spots, you can save money by learning the process and buying components separately. Six measures must be taken to fix it: fungicide, wood hardener, epoxy, and paint. Epoxy is a versatile material that can be used on smaller areas and larger areas, and can be moulded to create a variety of different effects. It should be sanded with no roughness and protected with a mask and goggles.
Content Summary
- Dry rot in wood that has been infected must be fixed if the timber is to be saved from future decay.
- Many various elements of a building are susceptible to dry rot, including the window sills, shutters, and roof runoffs.
- Wood that has been infected with dry rot must be repaired to prevent the fungus from spreading and becoming unusable.
- Dry rot, a type of wood degradation, can quickly spread throughout your home's framework if you do nothing about it.
- It is crucial to identify the root cause of dry rot before attempting a remedy.
- Although it goes by the label "dry rot," this decay can only occur in wet wood.
- If the wood has sustained just slight damage from the dry rot, it can be repaired.
- The next and most apparent stage in mending dry-rotted wood is the application of wood filler.
- In order to finish fixing the dry rot damage, you will need to sand, prime, and paint the wood.
- The root of this issue is a fungus that, through feeding on wood, causes dry rot.
- The rot inspection checklist should include the wooden window sills.
- You should inspect the wood for deterioration symptoms including cracks, splits, and discolouration.
- Inspect the roof, giving special attention to any areas that might have developed leaks.
- Dry rot can also set in at the points where the earth meets the wood of a building.
- It's also a good idea to look for water damage on the drywall.
- Wood can be checked for rot using a pick or screwdriver.
- The rapid spread and contagious nature of dry rot necessitate prompt remediation efforts.
- Find the source of the moisture and address the problem.
- Epoxy resin can be used to patch up minor rot damage in wooden structures.
- Make sure the deck and porch flashing is in good shape.
- Another telltale sign of dry rot is paint that is peeling, flaking, or blistering.
- The most vulnerable areas are window and door sills.
- Whether you opt to repair the wood or replace it, you must eliminate the moisture and warmth that fostered the rot in the first place.
- The Methods Used To Replace Wood That Has Been Ruined By Dry RotIn the same vein as with repairs, you should only attempt to replace rotten wood if you have a substantial amount of prior experience.
- If you find rot in your home, it's smart to get a professional's opinion as soon as possible.
FAQs About Repairing Dry Rot On Yourself
Dry-rot treatment can involve the removal of the affected timber (including all timber for a metre beyond the visible signs of the fungus). However, the modern approach is to use environmental controls, such as isolation and ventilation, which ensure that the conditions required by dry-rot, such as dampness and lack of ventilation, do not occur.
There are two approaches to treating this, and they both depend on the extent to which the fungus has spread. The first step is to strip the damaged area of the fungus as well as the paint, and then to treat the area with an effective anti-rot fungicide such as No-Rot Gel. After the gel has had a week to harden and dry off, it will be ready to be painted over once more.
It is possible to repair rotten wood by first removing all of the rot from the board or beam of wood that is being worked on. After that step is finished, you can next fill the area with wood patch or polyester filler, whichever you like. This material will solidify to provide strength and durability, fill the space, and make it possible to do so.
If the conditions are right, dry rot can increase its reach by up to 80 millimetres every single day. Dry rot requires temperatures ranging from 66 to 70 degrees Fahrenheit in order to reach the level of vigourous growth that it does. Additionally, in contrast to many other types of fungi, dry rot does not require a significant amount of moisture in order to develop rapidly.
Borate is one of the most effective fungicides that can be used in the treatment of wood rot. Boric acid is another name for borate. Either as a treatment to halt an active decay fungus from growing or as a preventative measure for future rot, it can be sprayed to wood while it is being constructed.