There are a few situations in which you might need to join timber beams together: when one beam isn't long enough on its own, when two beams meet on top of a post, and so on. Joining timber beams together can be done in a number of different ways. Conventional woodworking techniques are just one of many options for tackling this obstacle. This extensive question-and-answer post will go through some of the best and safest ways to join beams in a variety of settings.
The process of securing wooden beams is something every professional carpenter should be aware with. What would happen to your house if the weight of the living room, bedroom, or garage caused it to collapse? This post explains the procedure that must be followed to do this. Although the task at hand may seem insurmountable at first, it can be broken down into manageable phases that, when followed in order, will allow the work to be finished swiftly and with few resources required. Well, so let's get started!
How Should Two Joists Be Connected?
If you bolt the joists together, you can fit a wooden connector in the space that's created.
The ends of the joists should overlap by about 0.30 metres (about 1 foot), and a hole should be drilled through both pieces of wood, 12 millimetres in diameter, in the exact centre of the overlap. Slide a spiked timber connector over the end of the M12 bolt and washer used to attach the joists, and then tighten the bolt into place. Fasten the bolt with a washer and nut once you've threaded it through the hole in the second joist. Turn the nut anticlockwise with a wrench.
- The pieces of wood used to make the connections are often shaped like a ring, with the spikes pointing in all but one direction. Both pieces of wood have been eaten away by the spikes to the point that they are now worthless.
- This is an excellent way to attach the joists that support a floor or deck below without anyone noticing. You may make it look like one long offset joist by attaching them side by side instead of end to end.
Could Two Beams Be Joined to a Single Post?
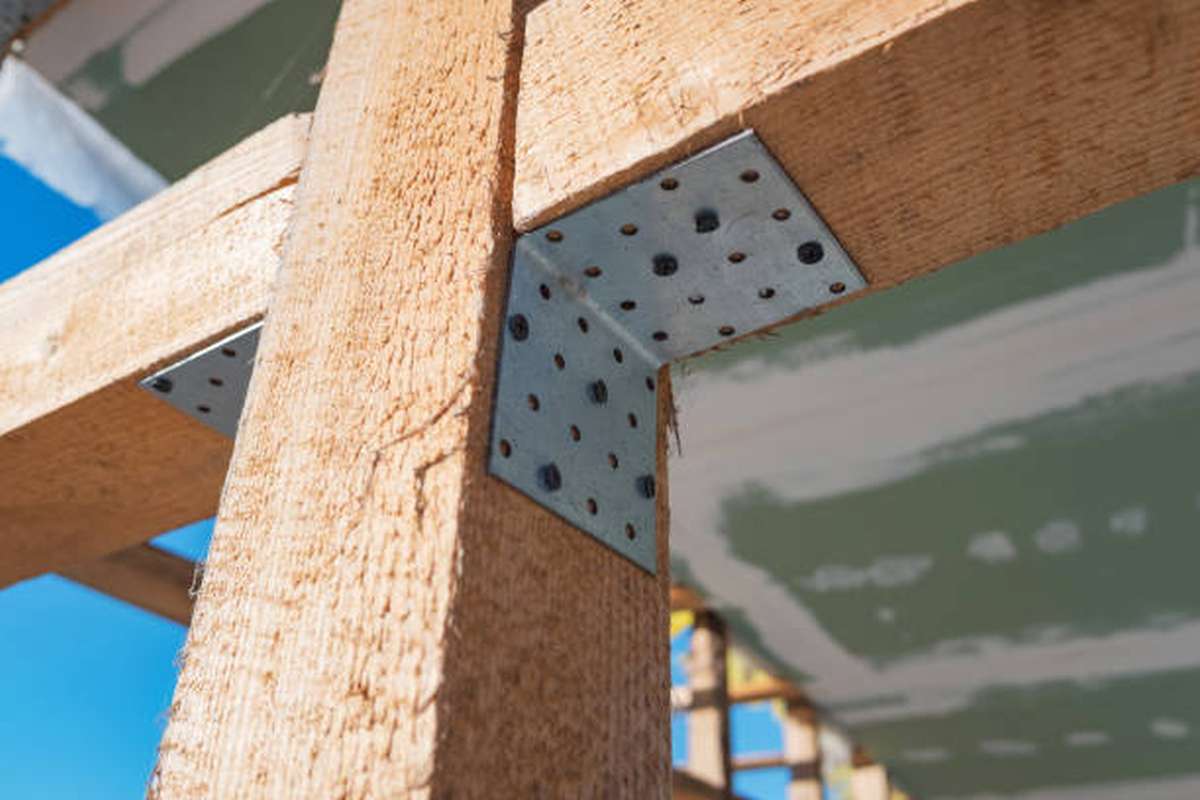
Install metal beam brackets to make sure the beams stay put.
The beam bracket you select should have dimensions that match those of the post and the combined thickness of the two timbers you'll be using. Place it atop the post and secure it with wood screws or structural nails via the predrilled holes. Position the two beams close together at the top of the bracket, and secure them in place by driving screws or nails through the bracket's sides and into the beams.
You would need a beam bracket that was 4 inches (10 cm) wide on one side and 5 inches (13 cm) wide on the other in order to securely fasten two beams, each of which was 2 inches (5.1 cm) thick, to a post that was also 5 inches (13 cm) by 5 inches (13 cm).
If you want to use components you buy from a hardware shop without having to do any additional measuring or cutting, this is your best bet.
You'll end up with a post that has a metal bracket attached to the top of it. This bracket is crucial because it ensures that the beams are centred on the post.
To prevent the beams from shifting, metal beam brackets must be installed.
- You'll need a beam bracket that's 4 inches (10 cm) wide on one side and 5 inches (13 cm) wide on the other if you want to join two beams, each of which is 2 inches (5.1 cm) thick, to a post that's also 5 inches (13 cm) by 5 inches (13 cm).
- If you'd like to avoid making any size adjustments to store-bought hardware, this is your best bet.
- An attached metal bracket marks the final result. The beams will always be centred on the post thanks to this bracket.
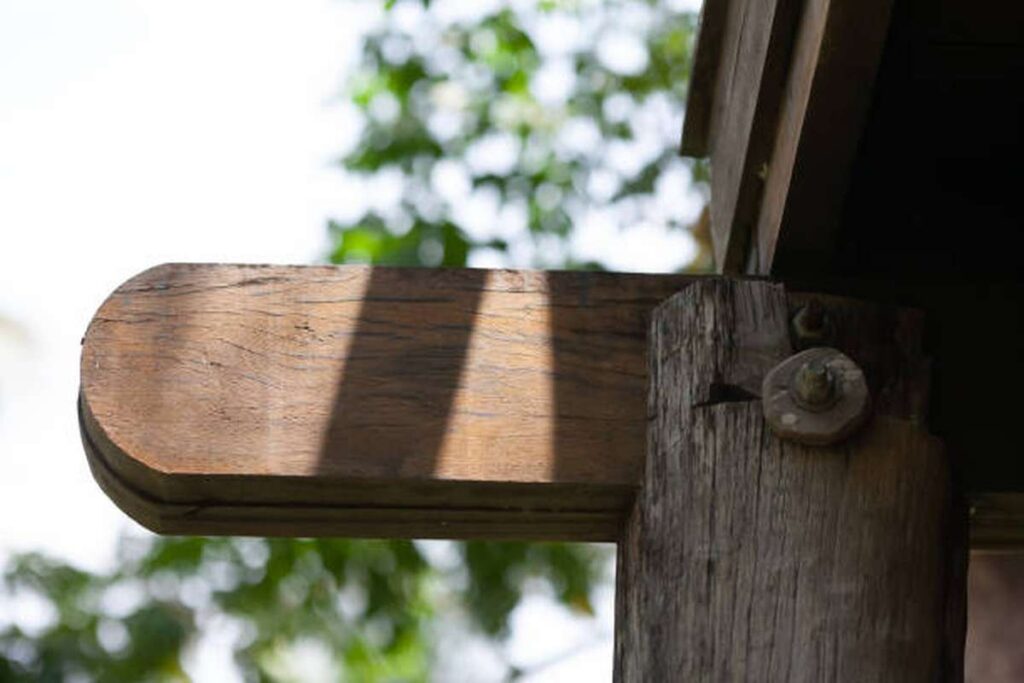
Fasten the bolts so that the beams are secured in the top notch of the posts.
Cut a notch in the top of the post with a circular saw at an angle that's the same as the sum of the beams' thicknesses. The distance between the beams is what determines how deep the notch is cut. To keep the beams in the notch, drill two holes through them and the post, spaced 0.5 inches (1.3 cm) apart on the diagonal. Each hole requires one carriage bolt with a washer attached, measuring half an inch in diameter (1.3 centimetres), to be slipped in, followed by another washer, the nut, and the other end of the bolt. Wrench the bolts and nuts until they are snug.
- Using 2" (5.1 cm) by 6" (15 cm) timbers as an illustration, you would carve a notch that is 6" (15 cm) high and 2" (5.1 cm) deep (15 cm).
- There are situations where this is the best course of action, such as when you don't have access to any commercially available equipment or when you want the beams to be at the same height as the post.
- This has the effect of making the beams flush against the post on both the side and the top.
- Always cut a groove in the side of a post before bolting beams to it, since this will prevent the beams from tearing off under the weight of whatever is lying on the post.
Are you familiar with the most sturdy type of wood joint?
Joints made with a mortise and tenon are some of the most durable options for joining pieces of wood together.
- Use of the phrase "this joint" in a sentence
- At the point where two beams will be linked together, one of the beams should have a hollow cut through it that is one-third the thickness of the timber and runs two-thirds of the way through.
- The next step is to apply wood glue to the peg and then press it into the opening once it has dried. It will connect the two beams together.
- As soon as the glue has dried on the beams, you should fasten them together.
- Mortises and tenons can be cut using a variety of methods, some of which are specific to the type of instrument being used (a hand tool or power tool). The mortise can be cut using a router and up spiral bit, while the tenon or peg can be cut with a table saw and jig.
- This connection is ideal for public settings, as it is aesthetically beautiful and conceals any fasteners.
- Mortise and tenon joints are useful for attaching boards both end to end and at right angles.
- There's a clear butt joint between these two planks of wood.
Where can I find instructions on splicing together two pieces of wood? Tell Me Where I Can Get This Piece.
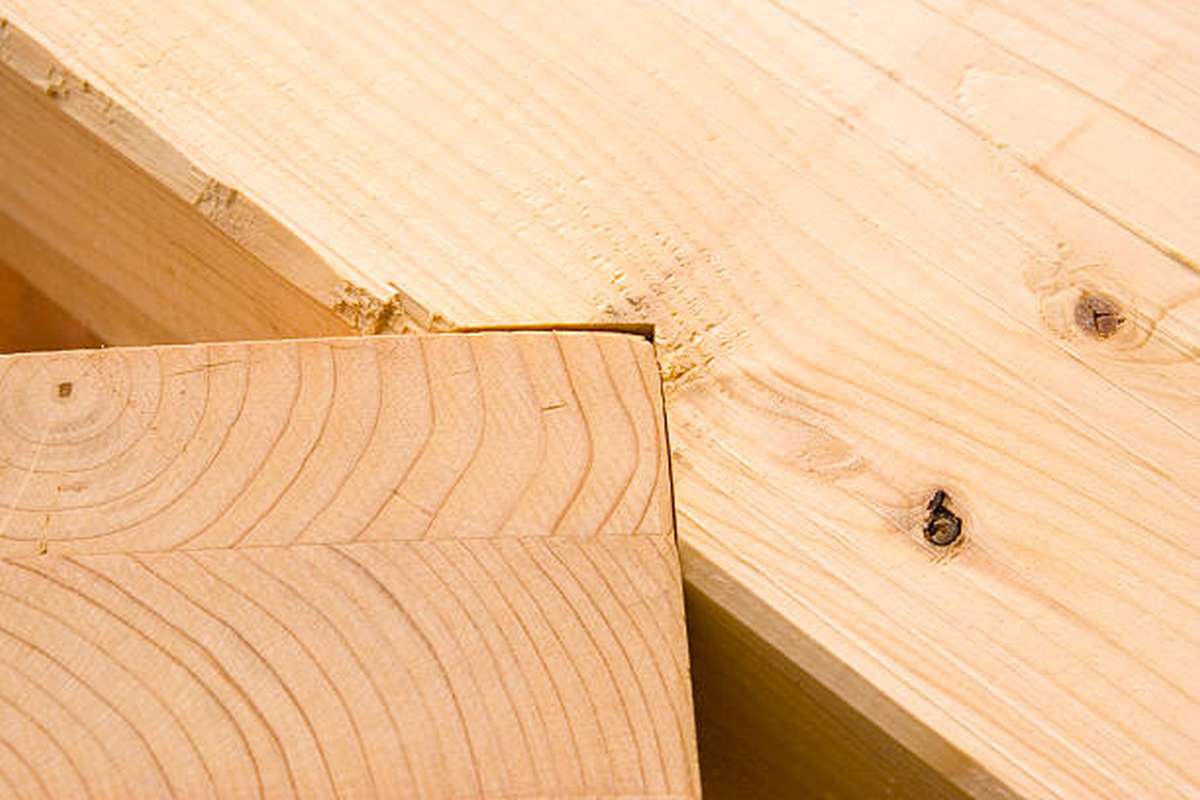
They can be linked with a half-lap joint.
It is possible to use either a table saw or a circular saw to cut notches in the ends of the two lumber pieces. Cut notches to a depth equal to half the thickness of the wood, and make sure they're all the same size. After the notches on both pieces of wood have been glued together, the pieces are stacked like a puzzle and fastened firmly to allow the glue to dry.
- To blend two pieces of lumber into one continuous board, this is a wonderful option because the join is barely perceptible to the human eye.
- The two pieces of wood appear to be one thanks to the flush joint.
- You can cut notches in the ends of the boards to any size you like. Half-lap joints are strong because of the contact between the overlapping ends of the timber.
- The junction between the two pieces of timber may need to be reinforced if the beam is to carry a lot of weight, thus a bolt may be inserted through it during construction. Using this method to create a beam that can withstand a great deal of weight is a brilliant idea.
- There are a number of options for putting two timber ends together, but none are as secure as lap joints. Because of this, beams are not the best application for them; instead, they are better suited for other woodworking jobs.
Is There a Specific Method for Connecting Timber to Form a 90 Degree Angle?
Join two pieces together with a mitre saw.
You can make the two lumber pieces face in different directions by cutting 45-degree angles into the ends of each one using a mitre saw. Apply glue to the angled cuts on both pieces of wood, then clamp them together until the glue is dry. The next step is to drill pilot holes on both sides of the 45-degree mitered junction, and then to drive wood screws or structural nails into the board from both sides. The nails will go all the way through both boards, making a strong joint between them.
- Mitre joints can be used to link two beams instead of butting their ends together, which is not a particularly strong connection. It is impossible to exaggerate the usefulness of mitered joints for aesthetic purposes.
- When a solid 90-degree connection is needed, this joint is prefered over more complicated procedures like mortise and tenon. This connection is used to join two pieces of wood at right angles to one another.
- When I consider this crossroads, I see the four wooden corners of a picture frame.
Broken or Missing Wooden Supports That Need to Be Fixed or Replaced
Exposed timber beams are often seen as a sign of quality and craftsmanship in a home, and the idea is shared by many. But they are more than just window dressing; they bear the building's load from floor to ceiling. That's why it's possible to enjoy them for more than just their aesthetic worth. Oak, prized for its durability and longevity, has always been the go-to wood for beams, though elm, ash, and many others have also been utilised.
Making the choice to keep existing timbers' finishes rather than replace or remove them is serious business. The special allure of a vintage property may diminish as beams are replaced. Sandblasting and other abrasive wood cleaning procedures can be detrimental to the wood and may even remove some of the original ornamentation.
When Should You Repair a Wooden Beam?
An old beam's strength comes with the drawbacks of being quickly deteriorated (especially at the ends) and easily twisted. Traditional carpentry methods, such as using well-seasoned and matching new timber, will frequently be adequate for fixing these flaws, but steel may be justified in circumstances where it allows more of the existing beam to be maintained than would be possible otherwise. Resins and consolidants, for example, have to be used, but they have to be handled with extreme care because of their sensitivity.
Can I Make It Easier for Them if I Do?
Although painting beams black was commonplace in the nineteenth and twentieth centuries, this method has since fallen out of favour. It's possible that this task will take a long time and be unpleasant to do. The wood is often treated with a bleaching chemical like liming wax or a casein-based paint to make it look brighter.
Brushing or washing the beams thoroughly with warm water is the best approach to get them clean. But if it turns out the black finish was the wrong one, chemical strippers are an option (although it is important to first test areas).
Before deciding that exposing a beam is necessary, you should check with the listing agency for approval. If the room is finished in a modern style, for example, the results of revealing timbers that were hidden during the Georgian period may be debatable.
When Should the Original Beams Be Replaced if They Are in Need of Replacement?
If the existing modern timbers are insufficient, or if a quick impression of character and comfort is required during construction, then it may be reasonable to use new timbers.
If you think the wood needs to be polished, you can use microcrystalline wax or a polish made of beeswax and turpentine. There are many of instances where this would be preferable to using polyurethane varnish, stains, or even contemporary high-gloss paint.
Description of the Development of Timber I-Beams
Roof joists from the Middle Ages were treated like royalty. The angles might be rounded off with some moulding, or "chamfered," and the chamfer terminations (sometimes called "stops") could end the chamfer in a number of different patterns.
Given the frequency with which ceilings were recycled, it is impossible to reliably determine their age from a superficial examination of their construction.
Some of the ancient timbers may still have their original paint treatments—both basic and decorative—beneath the surface.
Decorated plaster ceilings became popular by the end of the 16th century. In some cases, the beams and their attachments may be hidden by these roofs.
By the 18th century, all but the most modest homes had their timbers covered up with boards or plaster. This was, in fact, the case in the vast majority of households.
Movies were screened indoors for a while in the early modern period, but by the late 19th and early 20th centuries, they were screened outdoors once more, this time with the use of artificial darkness.
Improving Timber's Drawbacks en route to Its Pluses
The low total life cycle cost and several desirable qualities of timber make it an excellent material for use in the construction of outdoor structures and products. It's a go-to material thanks to its strength and, depending on the species and quality, its natural beauty.
Nonetheless, due to their unique characteristics, most woods have some limitations. With the help of contemporary treatments, however, these difficulties can be turned into advantages, and timber has emerged as a popular choice for usage in outdoor constructions and products.
We have weighed the benefits and drawbacks of constructing outdoor buildings out of wood. We will keep demonstrating the solutions to the challenges, making timber a viable alternative to many other building materials for structures of exceptional value and lifespan.
Advantages of using it include its convenience in accessibility.
Wood is a renewable material that may be transformed into several building materials. You may find it in any building materials retailer in Australia.
You can rest easy choosing this path.
Lumber comes from trees, which are naturally non-toxic, so utilise it without worry. The ageing process does not change its safety or environmental friendliness in any way, and it can be handled without worry at any point. It's safe for recycling or reuse, and doing so raises the building's Green Star Energy rating and the number of carbon credits it earns. Most contemporary timbers are either certified or acquired sustainably to ensure a long service life.
It's Almost Painless to Put Into Action.
As lumber has been used for construction for so long, it is safe to believe this is the case. If you compare hardwood timbers to steel, for instance, you'll see that they aren't the most difficult building material to work with.
The Value Is There for the Money.
Timber's shorter life cycle compared to other building materials means it uses fewer resources and is less expensive to produce. Because of this, wood is often used because it is less expensive than alternative building materials.
It has many possible uses and is both flexible and aesthetically pleasing.
The wide variety of species and grades of lumber available increases its flexibility and adaptability. Timbers of both structural and cosmetic quality are typically chosen for outdoor projects.
It has a high corrosion resistance by design.
Wood holds up well in the face of salt air and intense industrial activity, while steel and other regularly used building materials rust and corrode.
Disadvantages:
- Given that it is a natural material made up of cells, lumber expands and contracts in response to the changing of the seasons. During time and in different temperatures, timber can contract, expand, twist, fracture, and bend.
- Whilst some species of wood are far more resistant to insect infestation, rot, mould, and fungal growth than others, all timber must be treated with either LOSP or ACQ before being utilised in outdoor structures.
- When wood is not treated or painted, it can take on a silvery or worn appearance.
- Some people argue against using timber as a building material because it appears to have higher maintenance expenses than other options.
The goal now is to figure out how to make the constraints work to our advantage in order to construct robust, well-functioning buildings in light of our newfound knowledge of the benefits and negatives. Use of carefully selected visual grade timbers and treatment of the wood with a substance requiring low upkeep make up the solution.
- Selecting a premium quality of lumber guarantees a product that is both straight and homogeneous in density once it has been milled.
- For this reason, ACQ or LOSP treatment of the select grade of timber is essential.
Timber care might be costly, but it won't be necessary if you start with high-quality material and handle it right. Wood is desirable since it can be maintained without the use of harmful sandpaper or cleaning chemicals. Choose softwood pine or hardwood of the required visual grade and make sure you get it.
All hardwoods must be treated with ACQ to avoid insect infestation, rot, warping, and splitting. After then, you should take extra precautions with therapy to reduce the likelihood of future problems and expenses.
The final colour of any finish you apply to softwoods that have been LOSP treated in clear may not be what you expected. The following step is treating the wood with a professional-grade oil preservative. The industry in which a product was first implemented can tell you a lot about its longevity.
Conclusion
Joining timber beams together can be done in a variety of ways, including conventional woodworking techniques and metal beam brackets. Choose a beam bracket that is the same width as the post and thick as the combined thickness of the two timbers, secure it with wood screws or structural nails, and fasten the bolts to ensure the beams are centred on the post. Cut a notch in the top of a post with a circular saw to keep the beams in the notch, drill two holes, and use mortise and tenon joints to join pieces of wood together. Mortise and tenon joints are useful for attaching boards both end to end and at right angles, and can be cut using a variety of methods. Mitered joints are a strong way to join two pieces of wood at right angles to form a 90 degree angle, making them ideal for crossroads and other woodworking jobs.
Exposing timber beams is seen as a sign of quality and craftsmanship, but they are more than just window dressing. When should they be repaired or replaced? Check with the listing agency for approval. Timber is an excellent material for use in the construction of outdoor structures and products due to its strength, durability, and natural beauty. However, it has some limitations that can be overcome with modern treatments.
Wood is a renewable material that is non-toxic, safe for recycling or reuse, and less expensive than other building materials. It has many uses and is both flexible and aesthetically pleasing. Timber care is essential for building robust, well-functioning buildings, and must be treated with either LOSP or ACQ to avoid insect infestation, rot, warping, and splitting.
Content Summary
- Wrench the bolts and nuts until they are snug.
- This has the effect of making the beams flush against the post on both the side and the top.
- It will connect the two beams together.
- As soon as the glue has dried on the beams, you should fasten them together.
- Mortise and tenon joints are useful for attaching boards both end to end and at right angles.
- There's a clear butt joint between these two planks of wood.
- They can be linked with a half-lap joint.
- It is possible to use either a table saw or a circular saw to cut notches in the ends of the two lumber pieces.
- After the notches on both pieces of wood have been glued together, the pieces are stacked like a puzzle and fastened firmly to allow the glue to dry.
- Half-lap joints are strong because of the contact between the overlapping ends of the timber.
- There are a number of options for putting two timber ends together, but none are as secure as lap joints.
- Join two pieces together with a mitre saw.
- The next step is to drill pilot holes on both sides of the 45-degree mitered junction, and then to drive wood screws or structural nails into the board from both sides.
- This connection is used to join two pieces of wood at right angles to one another.
- Exposed timber beams are often seen as a sign of quality and craftsmanship in a home, and the idea is shared by many.
- Making the choice to keep existing timbers' finishes rather than replace or remove them is serious business.
- If the existing modern timbers are insufficient, or if a quick impression of character and comfort is required during construction, then it may be reasonable to use new timbers.
- With the help of contemporary treatments, however, these difficulties can be turned into advantages, and timber has emerged as a popular choice for usage in outdoor constructions and products.
- We have weighed the benefits and drawbacks of constructing outdoor buildings out of wood.
- Wood is a renewable material that may be transformed into several building materials.
- If you compare hardwood timbers to steel, for instance, you'll see that they aren't the most difficult building material to work with.
- Timber's shorter life cycle compared to other building materials means it uses fewer resources and is less expensive to produce.
- Because of this, wood is often used because it is less expensive than alternative building materials.
- Whilst some species of wood are far more resistant to insect infestation, rot, mould, and fungal growth than others, all timber must be treated with either LOSP or ACQ before being utilised in outdoor structures.
- Some people argue against using timber as a building material because it appears to have higher maintenance expenses than other options.
- Use of carefully selected visual grade timbers and treatment of the wood with a substance requiring low upkeep make up the solution.
- The following step is treating the wood with a professional-grade oil preservative.
FAQs About Timber Beams
Joining beams over posts can be done by either cutting a notch out of the post and splicing the beams together over the notch or by butting the ends of each beam together on top of the post and joining them using galvanized metal post caps.
You can use wood glue, metal straps, dowel joint, kreg jug, tabled lamp joint, half lamp joint, and bevel cut scarf joint to join two boards lengthwise. Gluing is the commonest method, so you may opt for it as your top choice. Apply the glue to the ends that need to be attached and clamp them.
Cut matching notches that are half as deep as the thickness of the timber and the same length as each other into the ends of your 2 pieces of timber using a table saw or a circular saw. Apply wood glue to the notches, fit the 2 pieces of timber together like a puzzle, and clamp them tightly until the glue dries.
Splices in beams should be supported by a post or structural column of some sort. The post or column should rest on a foot-ing that meets local building code requirements. And the beams should be connected to the post with an approved metal connector. Beams should be supported by at least 1 in.
Beams: Top reinforcement in beam is lapped at mid span as the beam does not experience any negative moment at midspan and so lapping is great in that region. In case of bottom reinforcement it is lapped near the ends and again the same concept applies as there will be no positive moment at the ends of the beam.