Beautiful and natural, wood has several vulnerabilities. Large wood cracks can be unattractive and affect your home's structure. Sealing these spaces with a high-quality sealer will prevent mildew or rot from getting into the wood. This blog post explains how to use an oil-based polyurethane sealer on hardwood walls or floors.
What Causes The Timber To Crack?
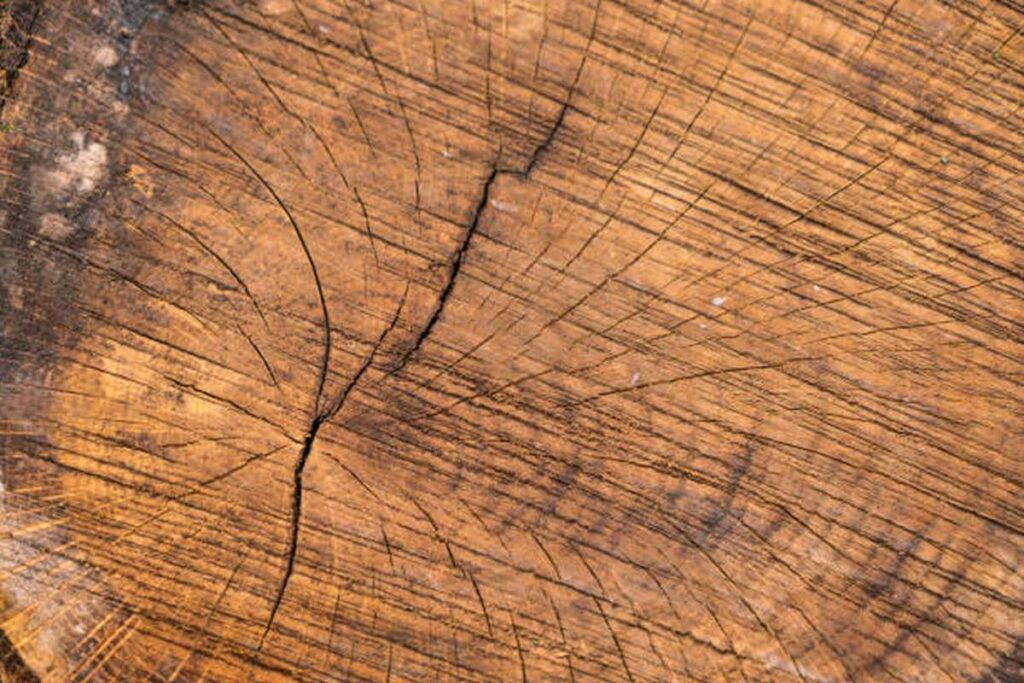
We are all aware that wood is a naturally occuring substance, and we also know that splitting in wood is caused by shifts in the amounts of moisture inside the wood and the subsequent shifts in the dimensions of the wood. Green wood is the term used to describe the wood that remains after a tree has been cut down for the first time. Green wood normally retains around half of its original weight in the form of water. Free water and bound water are two broad categories that might be used to describe this water.
The free water is quickly wasted; the capillary action in the wood is the only thing that keeps it in the wood. The bound water is maintained within the wood by chemical compounds known as hydrogen bonds, which are formed between the cellulose and water molecules. The purpose of drying wood is to reduce the amount of moisture contained in the wood to a level that is consistent with its environment, which is often between 25 and 30 percent. However, the wood will always work towards maintaining a state of equilibrium with its surrounding environment by taking in moisture throughout the winter and spring months and releasing it during the summer and fall seasons.
Changes in the amount of moisture contained inside the wood are what cause cracks to form in the wood. As a result of the differential drying of the outer and inner sections of the wood, these cracks emerge radially in bigger sections of the timber. This phenomenon is excellently demonstrated by the photo that can be found below:
Why Do Repairs To Timber Joint Seals So Frequently Fail?
Repair Of Timber Joint Seals Utilizing Fillers That Are Solid
Cracks in timber can sometimes be repaired with hard materials; when I bought my property, several cracks had been filled with render. Any material that is too rigid will not be able to move with the timber as it readjusts to the daily and seasonal shifts in moisture content that occur. The patch WILL break apart, come loose from the timber, and ultimately be ineffective. In the meanwhile, it is almost certain that it will create a means for moisture to gather and stimulate the beginning of the rot that you were hoping to stop. This will defeat the purpose of your action.
Repairing Timber Cracks With Various Flexible Fillers
At first look, it would seem reasonable to anticipate that a wood crack repair that was carried out using flexible fillers, caulks, silicone or butyl rubbers, etc., would be successful. However, these fixes are almost typically just temporary, leaving the door open for water to enter the structure within a year or two at the very most. The filler can be compressed or stretched to a certain extent, but it cannot be done so endlessly since it has elastic limits to its compressibility and stretchability. In other words, the filler is flexible. When flexible fillers are used to fix wood cracks, there is a high risk of two types of failure occuring:
- The caulk does not form a particularly strong attachment to the timber surface, and as a result, it becomes detached from the surface as the timber surface moves as a result of the crack's ongoing process of expansion and contraction. This shouldn't come as much of a surprise when one considers that the inner surface of the crack was probably exposed to the outside environment before any attempt was made to fix it.
- If a flexible filler is forced deep into a crack, it is possible that the filler will not be able to be compressed below a certain point as the fissure compresses. This generates strains in the timber, which in turn opens another crack in a different part of the wood.
Sealants Are Used To Repair Cracks In The Wood.
Shakes in the wood will normally diminish until they are completely gone if you are confronted with them. It is not possible to fill these with flexible fillers and backer rods, but it is not difficult to compel the timber in other areas to expand up. If extra waterproofing is required for faults of this sort, either prevent the entry of water into the property or protect the timber itself.
How Can I Repair The Cracks In The Wood?
- In spite of the fact that you may have made every effort to use wood that is free of cracks, splits, holes, or gouges, there are occasions when you wind up with faults that you either failed to detect or were unable to avoid. Wood putty, wax sticks, and shellac sticks are three examples of items that can be used to fix imperfections such as cracks, scratches, or joints that are only slightly out of alignment. These things each have their own particular advantages and disadvantages:
- Putty for wood: Wood putty is sold in the form of a thick paste that is applied to holes or cracks in the wood using a putty knife. After the putty has dried, it is then sanded smooth. Because it comes in a wide range of hues, you should have no trouble finding one that complements the kind of wood you're working with. In the event that you are unable to discover a suitable match, you have two options: either add some stain to the putty while it is still soft (before to applying it), or paint some artist's paint on the surface of the wood after sanding it.
- Wax sticks: Wax sticks are similar to crayons, however they are far more durable. They are available in a range of colours to complement the various types of wood. Before you apply the final finish, you have essentially two possibilities to use a wax stick, and the second opportunity is after the finish has been applied. Shellac is required to be applied to the wood in order to prepare it for usage in the process before the final finish is applied. Because the final finish already seals the wood, this step is not required when using a wax stick after it has been finished with the final finish.
- Draw it on by pressing it into the flaw using the tip of the wax stick, a putty knife, or your finger, and then remove the excess with a piece of plastic or another putty knife. This is how you apply a wax stick.
- Sticks of shellac : Shellac sticks are available in a plethora of colours, have a nice appearance, and are simple to apply. Shellac is a natural product that is low in toxicity and is created from the excretions of beetles. To use shellac, you must first melt it with a soldering iron and then allow it to trickle into the surface flaw. After that, you use a putty knife or chisel to press it into place, and then you wait for it to set. After the shellac has had time to harden, the surface is prepared for sanding by first being scraped flush with a chisel or a thin cabinet scraper, and then being softly sanded with fine sandpaper.
- A mixture of glue and sawdust: Because the sawdust is formed during the milling of the boards for the project, using a mixture of wood glue and sawdust to fill a hole or crack in a project enables you to achieve an identical match between the wood you're working with and the hole or crack you're filling. This low-tech approach involves exactly the perfect amount of glue and sawdust to obtain a filler that is both long-lasting and takes stains well. This is not difficult to do; it simply takes some trial and error.
Instructions On How To Fill Cracks In Wooden Objects
Even though cracks in wood are unsightly, there are a variety of treatments available on the market that can save even the most severely damaged pieces of wood. When it comes to effectively concealing large cracks in wood that is placed inside and has not been stained, wood putty or wood filler sticks are fantastic solutions that can be utilised. The use of a mixture of wood glue and sawdust to fill in gaps and cracks in built furniture is a speedy solution to the problem of minor cracks and gaps in the assembled piece of furniture. Epoxy is something you should look into purchasing if you're going to be dealing with larger gaps, such as ones that are common in outdoor tasks. After you have done mixing the material and sanding it, the damaged area that you patched won't be visible at all because it will have been repaired.
Utilizing Wood Putty Or Filler Sticks As An Alternative
Buy A Wood-Colored Filler.
Look for crayon-like forms of wood putty or wood filler sticks in the craft store. When you purchase these things online or at a retailer that specialises in home improvement, you have access to a wide range of colour options to choose from. Pick the one that blends in with the wood you're treating in the most natural way.
If you are unable to find the specific tone that you desire, you have the option of acquiring a wide range of colours and combining them in order to create a variety of different tones. This is something that you may do if you are unable to find the tone that you require.
If you intend to colour the wood at a later time, check to see that the product's label states that it can be stained if you want to use it for that purpose. It will acquire the colour of the stain, which will allow it to blend in perfectly with the wood.
Fill Holes With Your Finger.
If you are using one of those sticks, run it over the crack while it is still wet and rub it in. After that, you can use your finger to spread it out even farther if required if you feel the need to. When repairing a crack with putty, you can use a putty knife or chisel to help distribute the substance over the crack.
Fill The Crack Fully With Filler.
Continue to apply the filler until it reaches the rim of the crack, at which point you should stop applying it. Because of the overfill, it will be much simpler to integrate the crack by sanding and smoothing the filler after it has been placed. This is because the crack will be larger than it would have been without the overfill.
Using A Putty Knife, Smooth The Filler.
Before the substance has a chance to dry on the wood, make it as thin as possible by reducing the amount that is applied to it. In the event that you do not have a putty knife, you might use a clean rag or your finger to smooth the crack. Check that the cloth is clean before you use it so that you do not spread any dirt or dust.
After 8 Hours, Use The Wood Filler.
Because this information differs from product to product, it is important to check the product label to determine the recommended amount of time that should elapse before making use of the filler material. If you want to be absolutely certain that the filler is completely dry, you should give the wood some space for at least eight hours, or possibly even overnight. This is the best way to ensure that the filler is completely dry.
Sand Extra Filling.
In order to smooth out the cracked area, you can either use a plane or sandpaper with a very fine grit. Sandpaper's grit number ought to be in the range of 120 to 220, at the very least. Sandpaper or a wire brush can be used to remove the filler until the surface of the wood and the filler are as flush as possible. After everything is said and done, there shouldn't be any indication of the fracture in the form of a discoloured patch anywhere.
Putting Glue And Sawdust In The Cracks To Fill Them
Use Sawdust That Matches Your Wood's Type And Colour.
Because sawdust is used to cover the white glue and merge the crack, the sawdust you use must be as close a match as possible to the wood that is being treated. For the best possible mixture, obtain some sawdust from the wood by either sawing it or sanding it.
- When this is not an option, you should go to a hardware or home improvement store and buy a bag of sawdust.
Squeeze Wood Glue Into Cracks.
Pick up a bottle of wood glue at the local retail outlet. While maintaining pressure on the crack with the nozzle, squeeze the container of glue until it completely fills the area that needs to be repaired. You could also use a syringe, especially for smaller cracks, to ensure that the glue goes all the way down into the crack and fills it completely.
Cover Glue With Sawdust.
Sawdust should be applied in thick layers on top of the glue in order to fully coat it. After that, run your finger along the crack to make certain that the glue is holding the sawdust in place. As soon as you're done, the sawdust should cover up the glue so that it's not visible and make it mix in with the rest of the wood.
Dry Glue Overnight.
Let the glue sit undisturbed overnight before using it. Once the adhesive has completely set, the crack shouldn't be very noticeable anymore. If you can still see it after applying the glue and sawdust combination or another filler, you need to apply it again.
Sandpaper the crack until it is smooth. Using a piece of fine-grain sandpaper that has a grit range of 120 to 220, go over the crack and smooth it out. Rub down the treated area with extreme caution until the filler is completely smooth and undetectable.
Epoxy As A Method For Repairing Cracks
Wear A Mask Or Respirator In Well-Ventilated Areas.
Put on a mask before you start working with the epoxy since it is not something you want to inhale. This will keep you safe. Working outside is your best bet for safety, and you should make sure that no members of your family or pets are in the area where you are doing your work.
If The Crack Goes Through The Wood, Tape It.
Assuming that the fracture runs all the way through the piece of wood, cover one side with tape. The tape will keep the liquid epoxy in place for the necessary amount of time so that it can harden.
- In comparison to the other filler options, epoxy is the most effective treatment for major cracks.
In A Bowl, Mix Equal Amounts Of Each Epoxy Component.
Epoxy has two components that are combined into a single container: the resin and the hardener. First things first, make an estimate of how much material will be required to fill in the crack. Then place them inside the bowl, but hold off on mixing them for the time being.
- When the two components are brought together, the epoxy starts to set very instantly. Because you will only have about five minutes to get it into the crack, you should begin with a tiny amount.
Add Wood-Colored Dye To Epoxy.
Home improvement stores typically provide a wide selection of epoxy colouring dyes, powdered pigments, and metallic powders. If you're looking for anything specific, you might try searching online. Choose one that is appropriate for your endeavour, and then colour the epoxy by adding a few drops of dye or a dusting of powder.
- If you want the epoxy to have a dark colour, you can even add some used coffee grounds to the mixture.
Stir Epoxy Immediately.
Get a spoon or a stirring stick, and swiftly combine the components of the epoxy, along with any colouring that was applied. After a little period of time, it will transform into a substance resembling paint that may then be applied to the crack.
Spoon Mix Into Crack.
The stirring spoon or the stick can be used to apply the epoxy to the fracture. Put as much force as you can into it to get it to fit. The majority of it will eventually make its way to the base. If you don't have enough to fill the entire crack, you should make some more.
- When pouring the epoxy, use a needle to pop any air bubbles that may emerge in the mixture.
Larger Cracks Require More Epoxy.
Because it only takes a few minutes for the epoxy to set, you will know almost immediately whether or not you need to mix up another batch. Continue adding equal parts of the hardener and resin to the mixing container until the entire crack has been filled.
Dry Epoxy Overnight.
Between two and four hours later, the epoxy will have substantially dried out. Put your fingernail into it and try to move it. It is not ready if there is a ding left after you use it. It is always best to let it cure overnight, and in cool weather, it is absolutely vital to do so in order to ensure that the epoxy does not move around.
Sandpaper Levels Epoxy.
To begin, use a putty knife to remove any excess epoxy from the surface. After that, acquire some sandpaper with a fine grit (120-220) or a file and carefully smooth out the region that has been coated with epoxy until it is level with the rest of the board.
- If you have access to a block plane, you may make this step far simpler and avoid having to sand away a portion of the wood.
Color The White Spots Using A Felt-Tip Marker.
When you are finished, you could notice small flecks of uncoloured epoxy that has solidified. These can be coloured in using any marker that has a hue that is analogous to the dye that you chose to use. You won't even be able to see where the crack was, and you'll be able to continue working on the rest of your project.
How To Fill Wood Cracks Without Wood Putty?
Cracks or knots in wood can be filled without wood putty. Sometimes the perfect piece of wood is incomplete. It's not unreasonable; it's missing parts. A knot or burl may feature cracks or other abnormalities. You can reuse the plank since you can fill it.
Offering Choices
Other fill methods employ adhesive besides wood putty. Add cyanoacrylate to minor fractures when sanding. Sanding dust interacts with wet glue to seal cracks as you sand. This produces a quick repair with wood-like colour.
Hidden glue and sanding dust is another glue-swarf combo. It fills huge spaces and matches the wood's colour. The most adaptable is coloured epoxy.
Wood dust, pigments that mix or stand out against the surrounding wood, or decorative additives like metallic flakes or iridescent powders can colour the stain. Epoxy can hide wood cracks, allowing you to create a smooth surface.
Limit-Mixing
Epoxy tinting pastes in various colours are your best bet. Add the hardener to part A resin before mixing. Wood swarf, metal flake, pearl powder, or pearl powder are alternatives to dry pigment powder. If you're out of possibilities, try artist's oils or Japanese colours. Up to 10% by weight of epoxy pastes or colours can be added per cup of mixed epoxy. Small amounts of universal colourants or liquid dye concentrate, up to 2% by weight, will also work; however, you must wait a week before sanding and finishing to let the solvents drain.
Two percent by weight equals 3/4 teaspoon per cup of mixed epoxy. When using powders, pastes, or concentrates, mix the epoxy's two components before adding the colourant.
Avoid water-based compounds like mixed paints and acrylics. We avoid dry dye powders since even after mixing, the colour may not be precise. Always test new combinations or finishes on waste material first.
Start
Raise the void slightly above the surrounding surface. This lets you sand the solidified epoxy flush with the surface. If the crack runs through the wood, tape it. This prevents epoxy from dripping before curing.
Epoxy that has fully cured may produce "amine blush," a waxy surface coating. This layer can clog sandpaper and hinder finish curing. Scrubbing cured epoxy with a water pad before final sanding will prevent problems, especially if you plan to add an oil-based varnish. Thin finishes, like wiped-on oil, may make epoxy look glossier. Adding coats usually helps blend the sheen. Any film-forming finish works well over sanded epoxy.
Conclusion
Wood cracks can be unattractive and affect your home's structure, so it is important to use a high-quality sealer to prevent mildew or rot from getting into the wood. Flexible fillers, caulks, silicone or butyl rubbers, and sealants are used to repair wood cracks, but there is a high risk of failure due to two types of failure: the caulk not forming a strong attachment to the timber surface, and the filler not being able to be compressed below a certain point. Wood putty, wax sticks, and shellac sticks are three items that can be used to fix imperfections in wood, such as cracks, scratches, or joints that are only slightly out of alignment. Wax sticks are used to seal wood before and after the final finish is applied, and are available in a variety of colours, have a nice appearance, and are easy to apply. Wood putty or filler sticks are great solutions for concealing large cracks in wood that is placed inside and has not been stained, and can be used to fill in gaps and cracks in built furniture.
Fill the crack with filler, smooth it with a putty knife, sand it with a plane or sandpaper, squeeze glue into cracks, and use sawdust that matches the wood's type and colour. Epoxy is the most effective treatment for major cracks, and should be used with a mask or Respirator in well-ventilated areas. Epoxy is composed of two components: resin and hardener, which can be combined to form a substance resembling paint. Add wood-colored dye to epoxy, stir it immediately, pour it into the crack, and dry it overnight. How To Fill Wood Cracks Without Wood Putty? Epoxy tinting pastes can be added up to 10% by weight, but must be mixed before sanding and finishing.
Content Summary
- Large wood cracks can be unattractive and affect your home's structure.
- Sealing these spaces with a high-quality sealer will prevent mildew or rot from getting into the wood.
- This blog post explains how to use an oil-based polyurethane sealer on hardwood walls or floors.
- We are all aware that wood is a naturally occuring substance, and we also know that splitting in wood is caused by shifts in the amounts of moisture inside the wood and the subsequent shifts in the dimensions of the wood.
- Changes in the amount of moisture contained inside the wood are what cause cracks to form in the wood.
- As a result of the differential drying of the outer and inner sections of the wood, these cracks emerge radially in bigger sections of the timber.
- At first look, it would seem reasonable to anticipate that a wood crack repair that was carried out using flexible fillers, caulks, silicone or butyl rubbers, etc.,
- In other words, the filler is flexible.
- When flexible fillers are used to fix wood cracks, there is a high risk of two types of failure occuring:The caulk does not form a particularly strong attachment to the timber surface, and as a result, it becomes detached from the surface as the timber surface moves as a result of the crack's ongoing process of expansion and contraction.
- If a flexible filler is forced deep into a crack, it is possible that the filler will not be able to be compressed below a certain point as the fissure compresses.
- In spite of the fact that you may have made every effort to use wood that is free of cracks, splits, holes, or gouges, there are occasions when you wind up with faults that you either failed to detect or were unable to avoid.
- Wood putty, wax sticks, and shellac sticks are three examples of items that can be used to fix imperfections such as cracks, scratches, or joints that are only slightly out of alignment.
- These things each have their own particular advantages and disadvantages: Putty for wood: Wood putty is sold in the form of a thick paste that is applied to holes or cracks in the wood using a putty knife.
- Before you apply the final finish, you have essentially two possibilities to use a wax stick, and the second opportunity is after the finish has been applied.
- Shellac is required to be applied to the wood in order to prepare it for usage in the process before the final finish is applied.
- Because the final finish already seals the wood, this step is not required when using a wax stick after it has been finished with the final finish.
- A mixture of glue and sawdust: Because the sawdust is formed during the milling of the boards for the project, using a mixture of wood glue and sawdust to fill a hole or crack in a project enables you to achieve an identical match between the wood you're working with and the hole or crack you're filling.
- The use of a mixture of wood glue and sawdust to fill in gaps and cracks in built furniture is a speedy solution to the problem of minor cracks and gaps in the assembled piece of furniture.
- Look for crayon-like forms of wood putty or wood filler sticks in the craft store.
- If you want to be absolutely certain that the filler is completely dry, you should give the wood some space for at least eight hours, or possibly even overnight.
- This is the best way to ensure that the filler is completely dry.
- Pick up a bottle of wood glue at the local retail outlet.
- Sandpaper the crack until it is smooth.
- Assuming that the fracture runs all the way through the piece of wood, cover one side with tape.
- Because it only takes a few minutes for the epoxy to set, you will know almost immediately whether or not you need to mix up another batch.
FAQs About SEAL LARGE CRACKS IN WOOD
Yet everyone who makes furniture runs into this situation at some point. Nevertheless there are a number of ways of fixing these gaps in our projects' seams, including: glue and sawdust (which includes epoxy/sawdust mixtures), commercially available wood filler, and using a small sliver of the actual wood.
First fill the gap with a small amount of wood glue, then rub sawdust into the gap. The key here is to make sure the sawdust is from the wood project you are currently working on so the color matches. After the sawdust is rubbed in, use fine grade sandpaper to finish off the repair.
To fix split wood, first, determine the extent of the split. For clean breaks and tiny splits with no missing pieces, pour wood glue into the split and use a set of clamps to hold the split wood together until the glue dries. Fillers and dowels, however, become necessary when the hole is large.
Coming in as our number one pick is DAP Plastic Wood. This all-purpose, solvent-based wood filler is formulated with real wood fibers. It looks and acts like actual wood, except once it hardens, it's three times as strong.
- Wood glue – Fill holes using toothpicks and wood glue.
- Wood glue and sawdust mixture.
- Wood putty.
- Caulk.